
Part 4: THE BOW
Preparatory
tapes:
Use a middle tape. If the bow is too long, extend the forearm to find
the student's tip and add a tape.
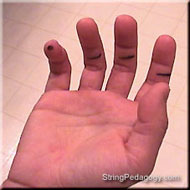
Pinky
House:
This is a little nest for the right hand pinky that helps the student
maintain a curved fourth finger. It is created out of tape and positioned
above the button on the frog.
Clip Title:
|
Pinky House |
|
Description: |
Making a pinky house for the bow hand pinky finger | |
Channel: |
104 | |
Duration: |
2'15" |
Parts
of the Bow:
Frog, middle, tip, upper half, lower half, bow hair, button, and screw.
Care of the Bow:
When introducing the bow to the student for the first time, the teacher strives to have the student experience the feeling that the right arm is relaxed, can feel its own weight, yet it is supported. The student's right elbow should feel loose and heavy in the teacher's hand. With the teacher's help, the student learns to find the ideal balance.
Clip Title:
|
The Bow |
|
Description: |
Parts of the bow, care of the bow, bow hold |
|
Channel: |
105 | |
Duration: |
3'29" |
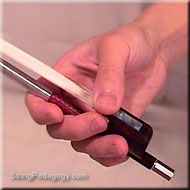
Bow
Hold:
Start the child out with the beginner bow hold--thumb on the underside
of the frog. This is the best way to create a proper, relaxed, right hand
position with the young violin student. (The student changes to the normal
bow position at "O Come Little Children".)
A review of the basic instructions:
KEEP THE THUMB RELAXED AND FLEXIBLE
 |
 |
 |
 |
| Finger Markings | Initial Thumb Position | Perfect Bow Hold |
Bow
Hold Games:
These games teach the student to maintain a proper bow hold in a variety
of different positions.
Clip Title:
|
Bow Hold Games (Group Lesson: Playing Together) |
|
Description: |
Group lesson bow hold games: Pinocchio, Unicorn, Space Shuttle, Windshield Wipers, 3,2,1-Go, shoulder bowing and first rhythms, Kodaly rhythms |
|
Channel: |
113 | |
Duration: |
15'48" |
Shoulder
bowing and the first rhythms:
Hold a paper tube in the left hand; then put the bow in the tube. Angle
the bow and tube over the left shoulder. This keeps the bow straight and
the rosin off the clothes. Place the right hand on the bow and tap the
index finger, two middle fingers and pinky to ensure that the hand position
stays loose. (Tapping the fingers will continue for many months.) The
teacher then assists the student in bowing the Twinkle rhythms--
| *Tiri Tiri Ti Ti | |
| Ti Ti bend Ti | |
| Grasshopper | |
| Mississippi is a River |
Teachers should feel free to use the rhythm system that works best for them. The teacher helps guide the student's bow by isolating the use of the forearm. The student then tries bowing alone.
SHORT STORIES
The Short Story of String Crossings
The Short Story of Fingers-Wrist-Arm
*Go to "Online References" found at the top of the page.